Earlier this year the driver side seat heater went out in my 2003 Acura TL Type-S. It wasn’t a problem since winter was almost over. But now the cold is coming back and I miss having a warm butt when I drive. So I did some online research and found that this is a common problem and the fix was neither difficult nor expensive. Below are the steps I took to repair my seat heater which is now working properly.
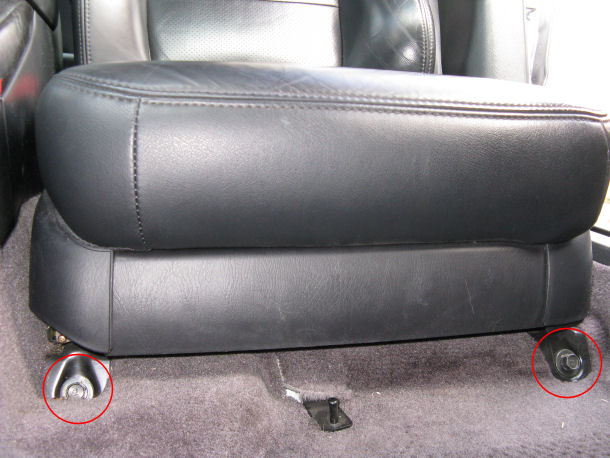
1. Move the seat into the fully back position for easy access to the two bolts in front. Remove the bolts using a ratchet.
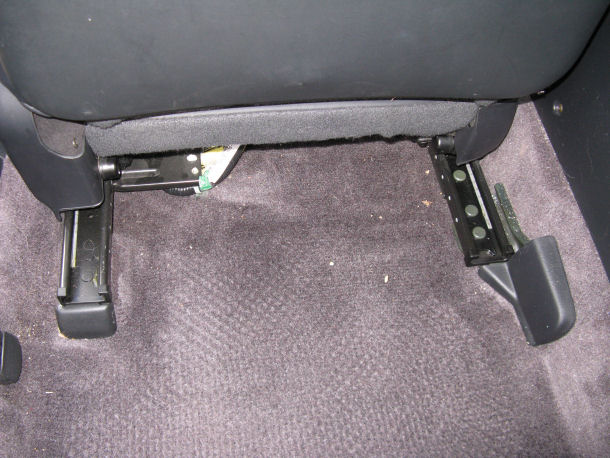
2. Move the seat into the fully forward position to access the bolts in the back. The bolts are concealed under small plastic covers.
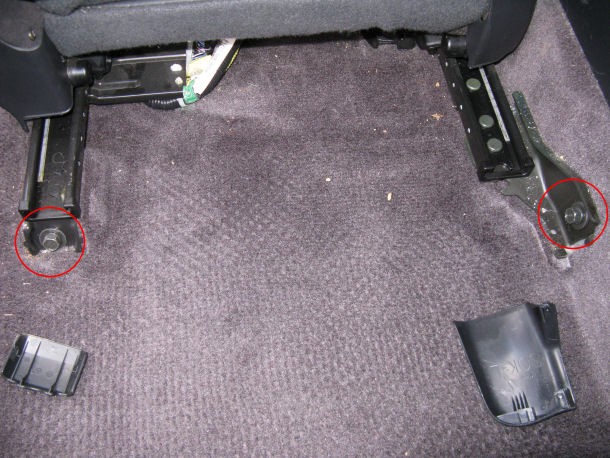
3. Remove the covers. Gently pull and wiggle on the covers and they should pop off. Remove the two bolts using the ratchet.
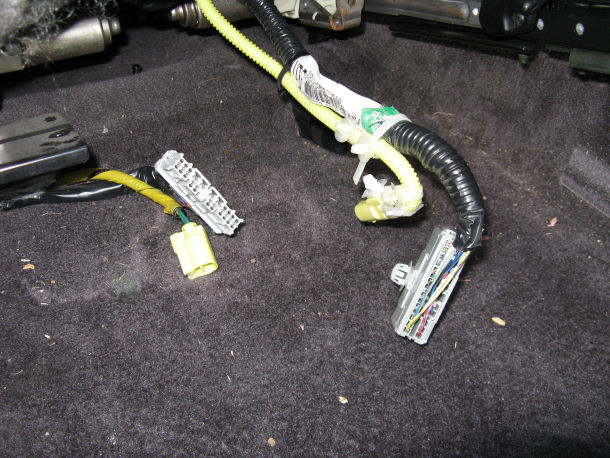
4. There are two wire connections underneath the seat, disconnect the wires. I found it helpful to lean the seat forward so I could access the wire harnesses with both hands. It also helps to pop the larger harness off the metal bracket underneath the seat.
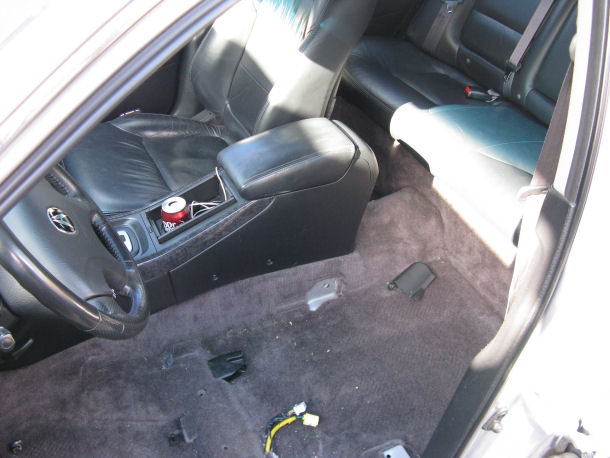
5. Remove the seat from the car. The seat is heavy. Be careful so you don’t scratch other parts of the car.
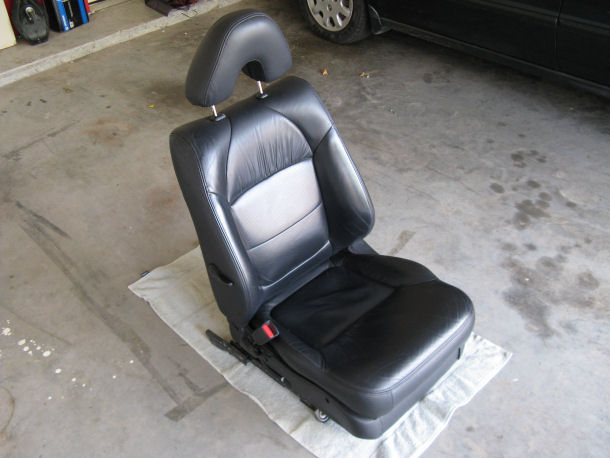
6. Set the seat on a soft surface. I used a towel. I also removed the headrest so I wouldn’t have to worry about scratching or scuffing it.
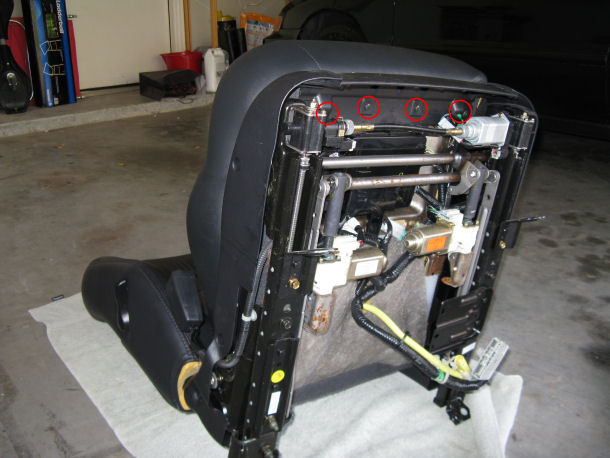
7. Set the chair flat on its back so you have easy access to the bottom. Remove the four screws that fasten the front plastic piece. There is a wire harness fastened to this front piece. You should pop off the clip that holds the harness.
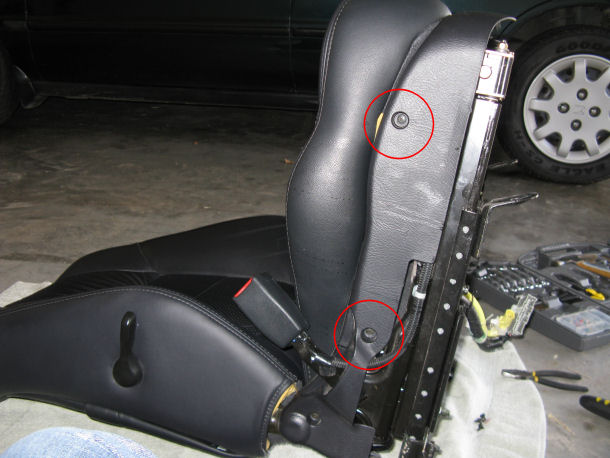
8. Remove the two screws that fasten the right side plastic piece.
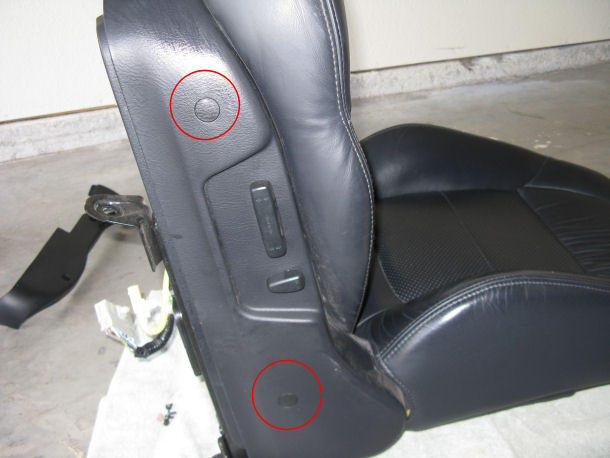
9. In order to remove the two screws that fasten the left side plastic piece, you will need to remove the hole covers. Use a very small flat head screwdriver to remove the covers. After you have unscrewed the two screws holding the plastic piece, disconnect the three wire harnesses attached to the power seating switches.
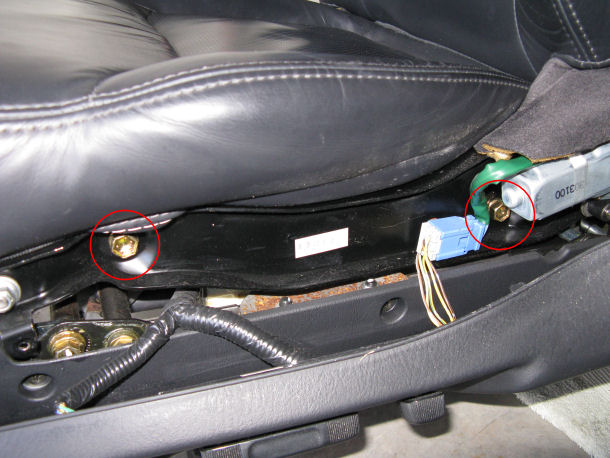
10. Remove the two bolts that hold the bottom seat section to the frame of the seat on the right side.
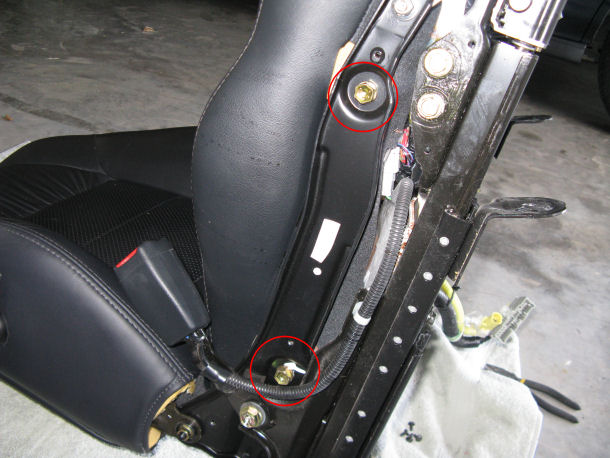
11. Remove the two bolts that hold the bottom seat section to the frame of the seat on the left side.
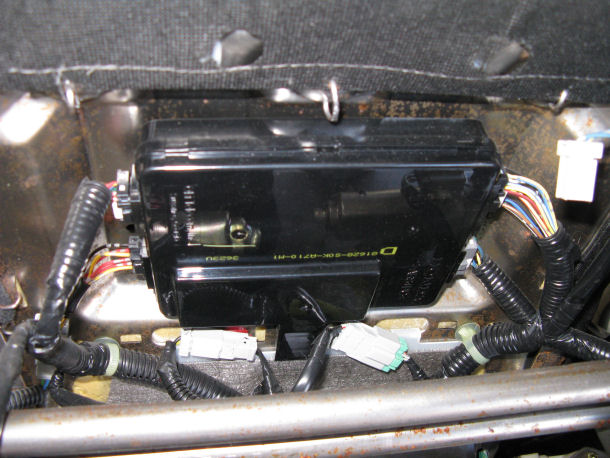
12. Disconnect all the wire harnesses underneath the seat so you have more room to work.
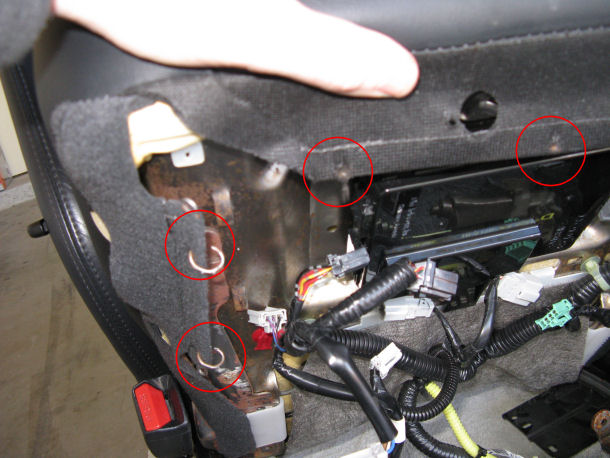
13. Remove the hog rings underneath the seat. There are two on each side and three in front. I found using two pairs of pliers make this job a little bit easier since I do not have hog ring pliers. You will also need to un-secure the plastic tabs that hold the leather in place in back. I found it easier to move those after I began to pull the leather off.
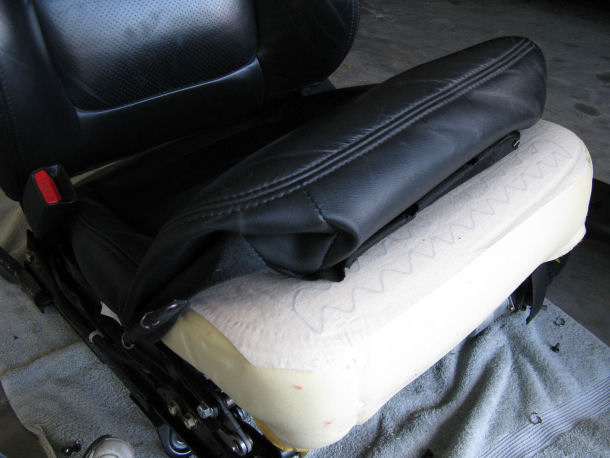
14. Begin gently pulling the leather cover from the foam cushion. There are more hog rings in the middle of the seat. Remove the three at the front and one on each side of the center pattern of the seat. The seat of a non Type S is probably a little different.
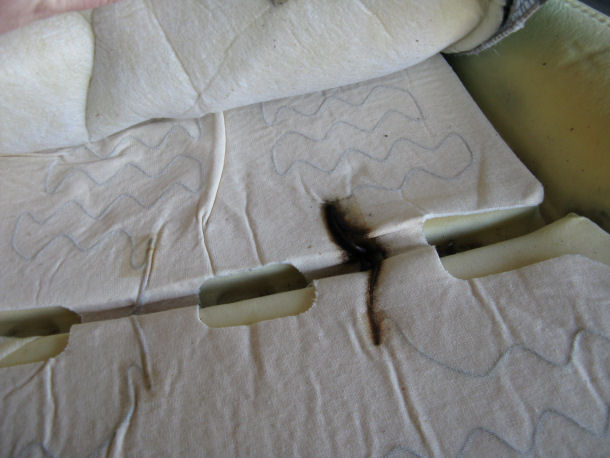
15. Pull back the leather a little more and the problem is exposed.
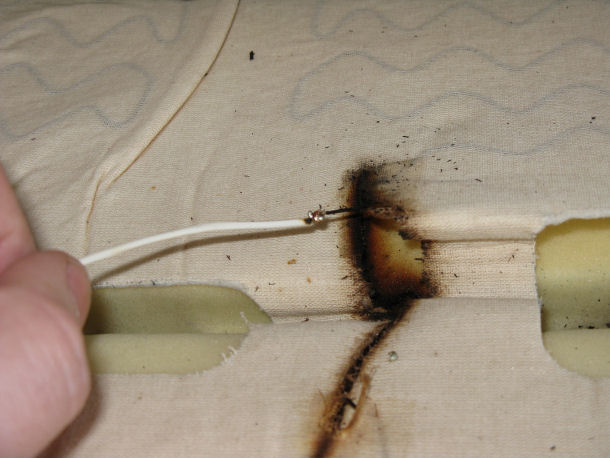
16. Remove the charred wire and solder on the replacement wire. I used a light gauge wire (about four inches). I tried to use a wire that closely matched the one that was originally there.
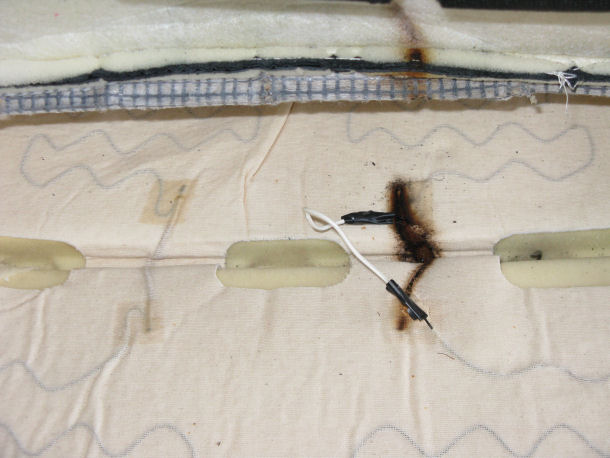
17. I taped the soldered connections and put the seat back together following these same steps in reverse.
Hints:
Be careful when moving the seat. It is very easy to scratch other parts of the car.
Make sure you don’t forget to reattach the wire harnesses; there are a lot of them. You will probably have to reset your memory seat positions after you have finished this repair.
Keep in mind that your owners manual says to only keep your seat heaters on high for a short period of time. Switch to low after the seats have heated up.
This is a great time to clean hard to reach areas of the car. I vacuumed underneath the seat and cleaned the plastic pieces that are too difficult to reach when assembled.
I am not a mechanic so this repair isn’t gospel. Follow these steps at your own risk.
For more great information about Acura, visit Acurazine.com.
If you find any of the JoshsWorld.com content to be helpful, entertaining, or life-changing, feel free to make a financial contribution on my Patreon account. Any contributions help me afford the time to create more articles, videos and other content.
Josh –
Thanks for the great info! I am looking at the seat heating pad of my wife’s 2001 TL – the wire is burnt – be still continuous – no break. Is that how your seat was before the repair – or was there a break in the heater wire?
Same problem here! Mine burned a notch in the seat foam, and in this case it was the left hand wire going under the metal rod, not the right.
I think I figured out the cause of the pad heating failures. Think of how that wire is routed–it goes underneath the metal rod (held down by the hog rings) within the seat fabric. If you figure that there is body weight on that, the wire probably stretched a bit thin from the stress, possibly even breaking some of the fine strands inside. That would make this particular spot in the wire the weak point in the heating element, and would therefore be the first part to burn out. What would also stretch those wires is if a person knelt on the seat to reach something, putting a lot of pressure on that metal rod.
I have the seat disassembled at this moment, but I’m seriously considering patching in a thicker wire on the other side of the pad also (the right side). The wire is not burned, but the fabric does look slightly brown where that wire passes underneath the wire.
There is a three-pin harness under the seat that can be tested for continuity. I had tested the seat back in the summer, discovering that there was indeed an open circuit in one of the seat heater elements. Once I’m done with my surgery today, I’m checking for continuity; the only other failure point might be in the seat back.
One final tip: one of the hog rings under the seat was already missing, and I think the other one fell inside the seat. It’s nothing a bit of metal coat hanger can’t fix!
I will tackle the passenger seat next. That seat also did not work when we bought the car back in late May (ours is a ’99 TL), but started working after a half hour on the road on a trip across town a few weeks ago. Intermittent…I bet it’s in need of the same TLC.
One last note to a previous comment: both seats in the TL have heating pads for both the seat cushion and the seat back; the Honda database shows replacements for both, and the service manual also shows heating elements in both cushions.
Thanks much, Josh! This’ll keep my better half’s rump roasted throughout the winter! 😀
Rudy, I hope you get that TL in good working order. The 2003 owner manual states: “Because of the sensors for the side airbag system, there is no heater in the passenger’s seat-back.” (page 99)
[pdf] http://techinfo.honda.com/rjanisis/pubs/OM/TL0303/TL0303O00092A.pdf
This is the case for model years 2000 and up. Since the 1999 models did not have side airbags it may actually have the seat-back heaters on the passenger side. Be sure to reply after you open it up to let everybody know for sure.
Correction: only the 1999 models have a seat back heater on the passenger side; 2000 and later only have it in the seat cushion.
Epilogue (and I’m done): with the three-pin male connector facing you, there should be continuity between pins one and two, and pins one and three (number one has the black ground wire going into it). If not, you still have an open circuit in the heating element. That is what happened with me.
Having fixed the bottom, I figured the element must have been broken on the seat back. Indeed it was, and again, it was underneath the rod held down by three more of those confounded hog rings! One spot was burned through, and the other side was also brown underneath the wire, so I replaced the wires in both spots. Having done that, I had proper continuity across the pins.
Removing the leather on the seat back is nowhere near as difficult. Once you remove the panel from the back of the seat (pull on the bottom, releasing two large clips, and it will slide down and off), there are four long plastic retainers hooked over long metal bars. Release those, and three hog rings tucking the leather onto the frame, and you’re almost ready. Remove the two collars for the headrest (you squeeze the tips of them up inside the seat), and the lumbar lever removes via an omega-shaped wire clip (which you can flick off with a miniature screwdriver). Once that is done, you can easily take the whole leather covering off, and you’ll likely see other burned spots needing repair.
Finally, the seat also has two sensors–a “thermostat” sensor (which helps maintain the correct heat) and an overheat sensor, which is supposed to shut down the heating element if it gets too warm. Apparently it doesn’t work well enough if we are burning these out inside our seats! There are also resistors inside the seats as well–high heat goes through a separate circuit, and the lower heat is a reduced-wattage circuit that passes through the resistors. A simple system, but with delicate wiring.
Rudy, Thanks for the additional info! That should really help people repair the element in the seat-back.
Thanks friend!
We have in Novosibirsk in December 2012 was the temperature -40, it’s very unpleasant to sit on the leather seat. With the help of Your Board easily eliminate the damage.
This worked great thanks
i have done mine and replug all connectors and now the seat not working at all no tilt no backward no forward nothing ????
You reconnected the wiring harnesses to the seat controls incorrectly. It is an easy mistake to make.
Josh – Love you for taking the time to put this fix online! For any of you who think you can’t do this, my 80 year old Dad (who is great with electrical and mechanical work) and I (48 year old female) successfully fixed my 2002 Acura TLS. My Dad didn’t want to solder the wire, he thought it looked to fragile so we used a wire connector.
Put it back together and I now have a heated seat again!
Thanks again Josh!!!!
Josh you should also remind , everyone that you will have to reset the srs light after taking the seat out. Thanx a lot thou for the help
in fixing my seat heater, couldn’t have done it with out you . Thanx again
Thank you for this post everyone, I have a 99 with the driver’s heater only working on high, I will take it apart and report back.
Thanks Josh for all your work here!
Seat heating pad now works, but strangely the reassembled seat now only moves forward or back in small one second increments.
I cannot hold the switch continuously to move the seat forward in one movement. I have to press the switch repeatedly as it moves about two inches forward each time.
Perhaps an electrical problem, any ideas? Is the motor sensitive to misalignment? Could it be stopping as it senses binding?
Josh, I know it’s been a few years since you made this post. But we just fixed our 2002 MDX. Thanks so much for posting this. It’s has saved a lot of people a lot of money. The hardest thing to deal with was the hog rings!! Otherwise it was a piece of cake.
Hi Josh, thanks for fine job you did on this piece.
I reached to the heating element pad, but nothing was wrong with it.
is there any other place that I should check for seat heater malfunction?
Thanks for the video. I followed it today and fixed the broken wire in my seat. One problem though. When I put the seat back the power functions are not working. Think I might have missed a connector or is it something else? Thanks
is it possible to just remove the seat cover while its in placed without removing the seat from the car ??????
No. You need to take the seat out. It’s just 4 bolts; it’s practically the easiest part of the job.
Thanks josh for great post regarding seat heater fix of Acura TL
Awesome stuff. This video and some primo comments (Rudy!) let me fix my seat heater. I had one additional issue that may help some folks: one of the male pins for the heater switch was bent…so it wasn’t making proper electrical contact even though the female plug clicked it fine. Looking at the male pins, they should be arranged like this:
-1- -2-
-3- -4- -5- -6-
However, mine looked like:
-1- -2-
-4-
-3- -5- -6-
I just took some needle nose pliers and bent the #4 pin level with 3, 5 and 6 and everything worked after reconnection!
Also, I didn’t mess with putting those stupid hog rings back on. I just used some 22 (?) gauge bare wire. Way simpler to reinstall. Just cut a 3″ piece, loop where needed, and twist the ends several times,
Whoops…looks like some auto-formatting was done to my pin diagrams. In word form: there should be two rows of pins.
Top row: Pins 1 and 2. Pin 1 is left justified, 2 is right justified.
Bottom row: Pins 3, 4, 5, and 6 space evenly with Pin 3 below Pin 1 and Pin 6 below Pin 2.
My Pin 4 was bent up. Bending it back down was the fix.
What specific gauge should be used to replace the bad connection being cut out? Just want to make sure I am doing this right the first time so I won’t have to take the seat out again.
Thanks!
My button ”HI” not work but ”LO” button seat warming.. any ideas for that??
Can change or fix HI thermostat? Any part number for that?
Love it. haha….its amazing what you find when you Google.
aai
Thank you! Even though I had done this job years ago, it was a lot easier with your instructions. Last time I did it, I used new hog-rings, but this time I just used baling wire. Much easier. Also, 2001 TL has some differences in the wiring harnesses, but everything else seems to match perfectly.