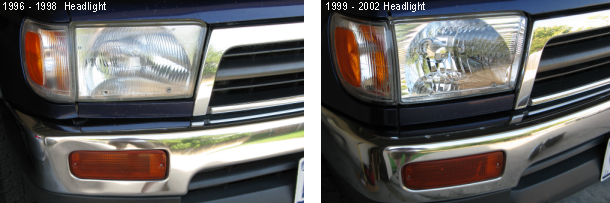
A common upgrade for for 1996 through 1998 Toyota 4Runners is replacing the headlights with the new, more modern looking headlights found on the 1999 through 2002 model years. This modification is simple and can be completed in less than an hour. The major difference between the modern headlights and the old style is the clearer glass lens. Fitment is unchanged, so swapping the headlights is an easy job. I purchased a new pair of headlights for my 1997 4Runner from Ebay and paid just under $80 (including shipping). You can probably find them at any online auto parts retailer, just search for 1999 – 2002 Toyota 4Runner headlights. All trims use the same headlights (e.i. SR5, Limited, 2WD, 4WD). This is a quick and easy way to give your older third generation 4Runner an updated look.
How to Upgrade Toyota 4Runner Headlights
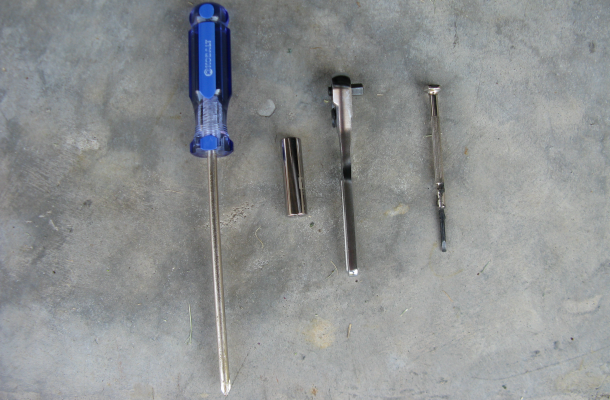
The following tools are used for this project:
- Phillips head screwdriver
- ratchet with deep 10 millimeter socket (small 10 millimeter wrench will work too)
- small flat head screwdriver
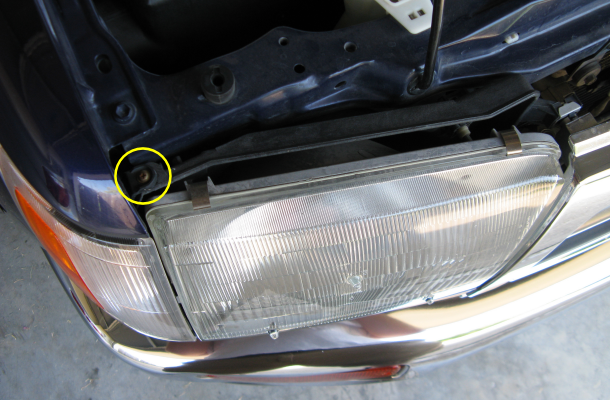
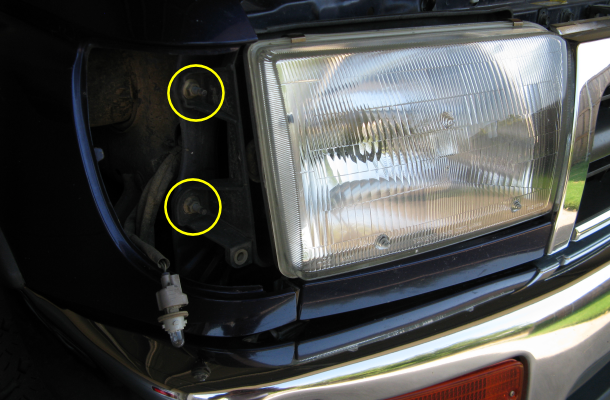
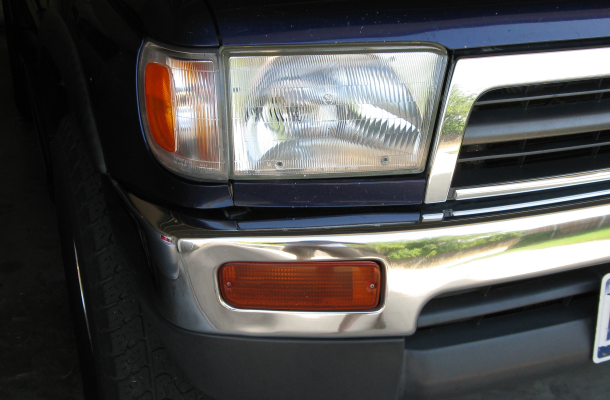
Pop the hood. For added safety, disconnect the battery. Located on the top of the headlight (close to the fender) is the screw that fastens the turn signal light. Unscrew it to loosen the piece.
Gently wiggle the side light while pulling forward to remove the light. Once the light is out, twist the lamp connector counter-clockwise to remove the lamp and completely detach this component.
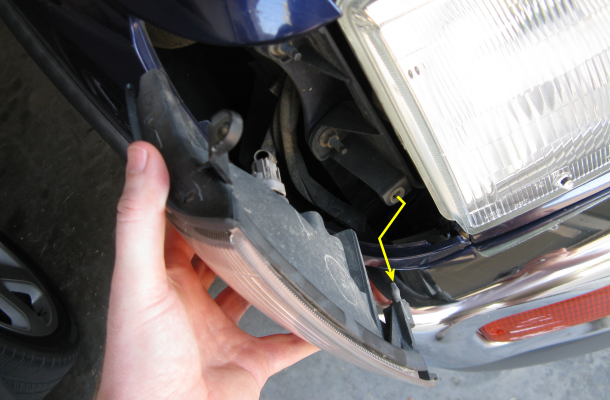
There are two 10 millimeter nuts behind the turn signal indicator, remove them.
Next, remove the grill. In order to remove the grill, release the six fasteners that hold it in place. Each fastener needs to be compressed on the top and bottom, then the grill will pull straight out. To compress the fasteners, use the small flat head screwdriver. First, push straight down on the small black piece that is visible (shown in blue rectangle below). Underneath, do the same thing. As you release each fastener, slightly pull the grill forward.
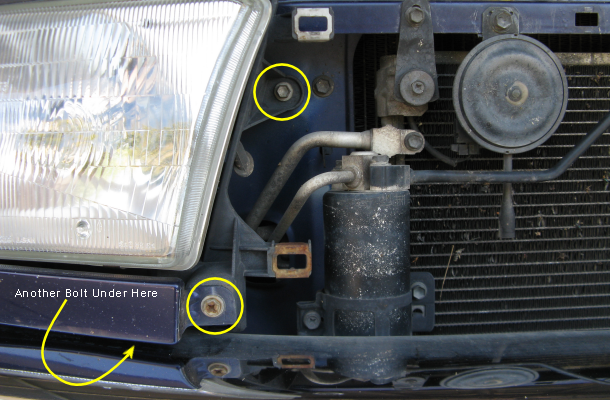
Once the grill is removed, you will have access to the remaining screw/bolts. Remove the screw first that fastens the body trim piece (bottom screw pictured). Underneath the body trim piece is another 10 millimeter bolt, remove it. It may be easier to access this bolt from underneath the vehicle. Remove the top bolt shown. This is the last bolt that holds the headlight assembly in place, so support the headlight with your other hand.
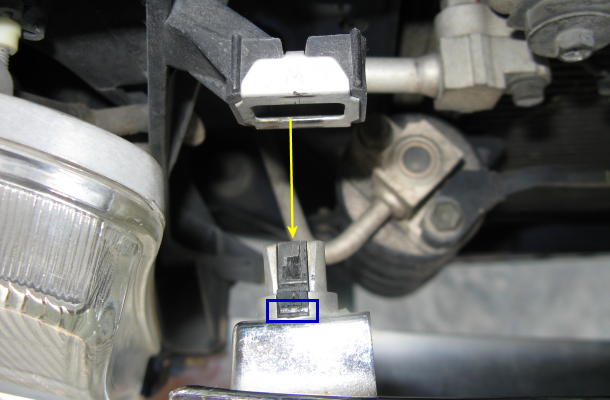
Pull the headlight assembly forward to disconnect the lamp. Press the tabs and pull the socket out. Mine was dirty and a little rusty, so it required a bit of tugging to free the connector.
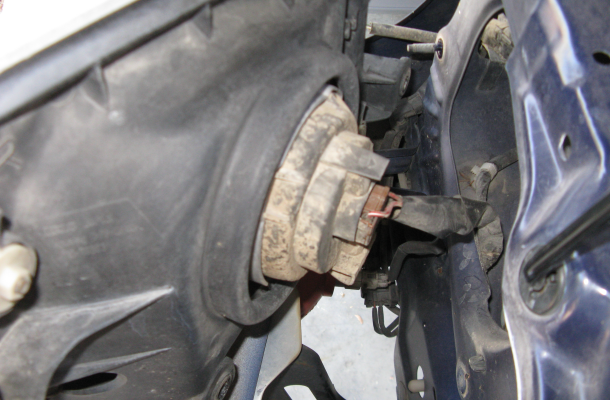
The new headlight assembly will simply fit into the exact same position as the old one. Connect the lamp. Align the bolt studs and holes with the new headlight and begin to reassemble in the reverse order that you removed the headlight. It took a fraction of the time for me to install the second headlight unit. After installing the second light, snap the grill back into place and you are finished.
BEFORE: 1996 – 1998 Headlight
AFTER: 1999 – 2002 Headlight

Tips:
- Once you have installed the first headlight, reconnect the battery and test to make sure the light works before you tighten down all your bolts or install the second headlight.
- While the grill is off the truck, clean debris out of the radiator since it is easy to access.
- You can sell your old headlights on Craigslist! I sold mine for $25 (in less than 3 hours after placing the ad). I probably could have asked for double that amount, but I helped out a fellow 4Runner owner. That made the net cost of this project under $55.
If you have any question about this project post them below. Also, online enthusiast forums are a great resource for additional help.
If you find any of the JoshsWorld.com content to be helpful, entertaining, or life-changing, feel free to make a financial contribution on my Patreon account. Any contributions help me afford the time to create more articles, videos and other content.
Hey Josh,
Thanks alot for posting this,this is a great article and very useful. Ive had trouble before with those damn front grill clips they are a nightmare! Thanks again for posting this,very useful and im off to ebay now to start looking!
hey josh-
nice post. did you also replace the side blinkers?
No, I kept the same blinkers.
Big thanks for this article. I am thinking of retrofitting my 4runner with Bi-Xeon lighting and needed the lenses to be clear. Looking for the newer model headlights I found they are about %52 cheaper than the old ones with the clear lenses. I owe you a beer.
Do you have any idea where i can find the little body trim piece that goes under the headlight
Try local salvage yards. Another good resource is the 4Runner Forum Classifieds.
JOSH, ARE YOU ABSOLUTELY SURE THAT THE 99-02 HEADLIGHT ASSEMBLIES WILL FIT A 98 4RUNNER LIMITED? EVERY WEB SIGHT I’VE TRIED TO BUY LIGHTS FROM SAYS NO, THEY WON’T FIT. I JUST NEED TO BE POSITIVE ON THE FIT, BECAUSE BESIDES THE GRILLE, I ALSO HAVE TO REMOVE(PRETTY SURE) A HUGE CHROME BRUSH GUARD/PUSH BAR. (OH JOY) THANKS
Hi Jeff, I am absolutely sure the 99-02 headlight assemblies will fit your 98.
THEN YOUR WORD IS GOOD ENOUGH. THANKS FOR THIS POST & INSTRUCTIONS/PICS IT’S GONNA MAKE THE JOB SO MUCH EASIER. NOW, OFF TO BUY MY LIGHTS.
Hi there. Thanks for the great info. Do you know if the 1999-2002 turn signal side marker signal assembly is the same for a 1996?
It is the same.
Thank you for this. I was struggling to learn how to remove my headlight this evening and couldn’t figure it out in the semi-dark. This sheds some “light” on the subject! I look forward to finishing the job tomorrow! Thanks!
Josh thank you with this post I made the change in less than 30 the clips had me beat as they are hard to get at on the bottom side. By releasing the top and putting slight pressure on them they popped out with no damage at all. Thx again Armin
Those clips were tricky. My neighbor and I were totally scratching our heads on that one. We wondered if there was a special tool to do that part of the job.
Eventually, I used a small screwdriver to get the top clip, and with my other hand, I used a very small set of needle nose pliers to push in the bottom clip. They popped RIGHT out after that. Once I had a solution, it was all of 1 minute to get the grill off.
Again, thanks Josh, for the site and instructions. I want to do the carpet replacement in my 4Runner. Consider this site bookmarked!
can you still adjust the aim of the headlights when doing this swap? i have a 96 4runner.
Good write up , thanks !!
I know this is way too late, but concerning the tabs for the grill: if you look at the front of the grill, right where the grill tabs are located, there is actually a piece of the tab that sticks out the front of the grill. Push down on that and the grill comes right out.
I know that might sound confusing, but before you go breaking almost all the tabs by pressing down on the top (like I did), look through the front and find the small release tab to make it easy on yourself
Thanks for your post dude! ?
Thanks for the instructions. I just switched out the lights on my ’97. Much easier knowing the steps ahead of time. I couldn’t get the grill tabs out without breaking them, they were just too brittle. Popped the grill back in, even with half the tabs, and they are holding fast.
Hey do anyone know if a 98-2000 Toyota 4runner headlight assembly will fit a 96 4RUNNER cause I want to get a whole new kit for mine
yes. it will fit.
will the 98-2000 4runner headlight assembly fit on a 1995 4runner
No.
do you know if the side marker lights from the newer 3rd gens also double as turn signals or just running lights? I’m doing a retrofit rebuild and definitely want to get a hold of some newer 3rd gens housings for a cleaner look
I lost the screw from this picture: https://joshsworld.com/images/replace-headlight-02.png . Does anyone know where I can get a replacement?
Thanks for this! Of course, diving into a 26 year old 4Runner you find all the bodge jobs left behind by previous owners. Anyhow, lights are in but about 30 miles later the truck threw a CEL which it has never done before. May be coincidence but…?